Archive

Archive for the ‘Powershell’ Category

Set account to expire on midnight

April 20th, 2015 No comments

Customer requested to force active directory accounts to expire on midnight or in the night and not during the day. So I’ve created following script to do so:

$UserList = Get-ADUser -Filter * -SearchBase "OU=USERS,DC=domain,DC=local" -Properties "DisplayName", "PasswordLastSet"
$Today = (Get-Date)
$MaxPasswdAge = (Get-ADDefaultDomainPasswordPolicy).MaxPasswordAge

ForEach ($User in $UserList)
   {
   $ExpireDate = ($User.PasswordLastSet) + $MaxPasswdAge
   $DaysToExpire = (New-TimeSpan -Start $Today -End $ExpireDate).Days
   If ($DaysToExpire -eq 1)
      {
      Set-ADUser -Identity $User -ChangePasswordAtLogon $true
      }
   }

#EOF

This script runs everyday at 23:55.

I found couple examples how to change pwdLastSet attribute on AD user’s object, but I don’t like that. I think this is cleared way to do so.

Have a nice day,

How to track deleted files

October 21st, 2014 1 comment

I am often asked to restore files on fileservers and also look for user who deleted files. By default there is no auditing for files enabled on fileservers. I will write how I do enable it and how it works for me.

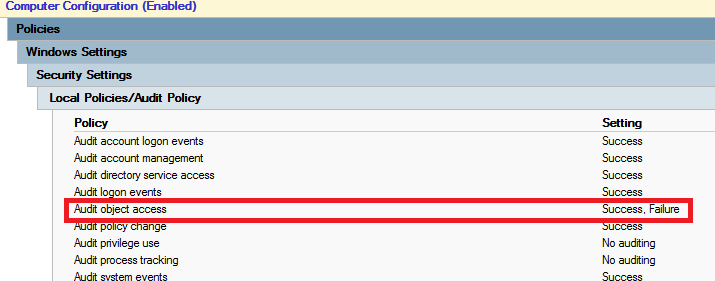
First of all you need to enable audit policy Audit object access. This audit policy handles auditing for files, registry keys, shares, … To enable this audit policy you need to set it in GPO Computer Configuration – Policies – Windows Settings – Security Settings – Local Policies – Audit Policy – Audit object access and set it to Success, Failure.

Audit object access

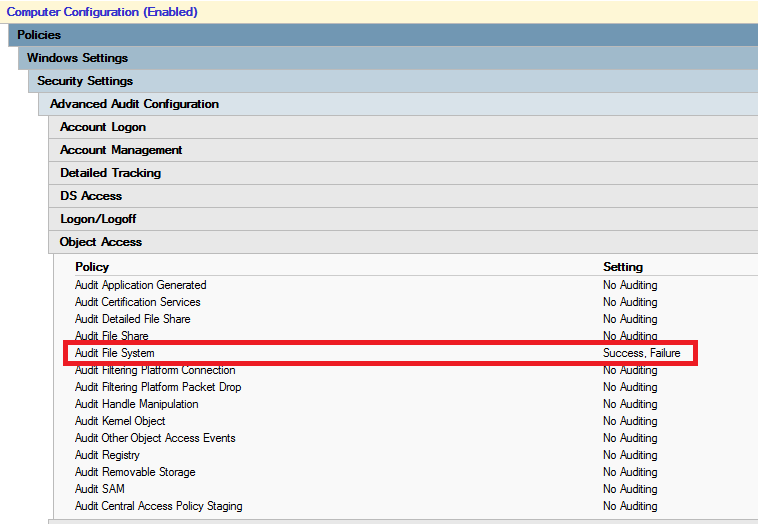
This audit policy enables auditing for lots of objects to audit. I want to audit only File System. To find out what audit policy settings are applied on computer use following commnad auditpol.exe /get /category:*. To enable only wanted auditing I have dumped settings using auditpol.exe command and set same auditing in GPO, but under Object Access I just enabled File System auditing. You can set this settings under Computer Configuration – Policies – Windows Settings – Security Settings – Advanced Audit Configuration.

Advanced Audit Configuration

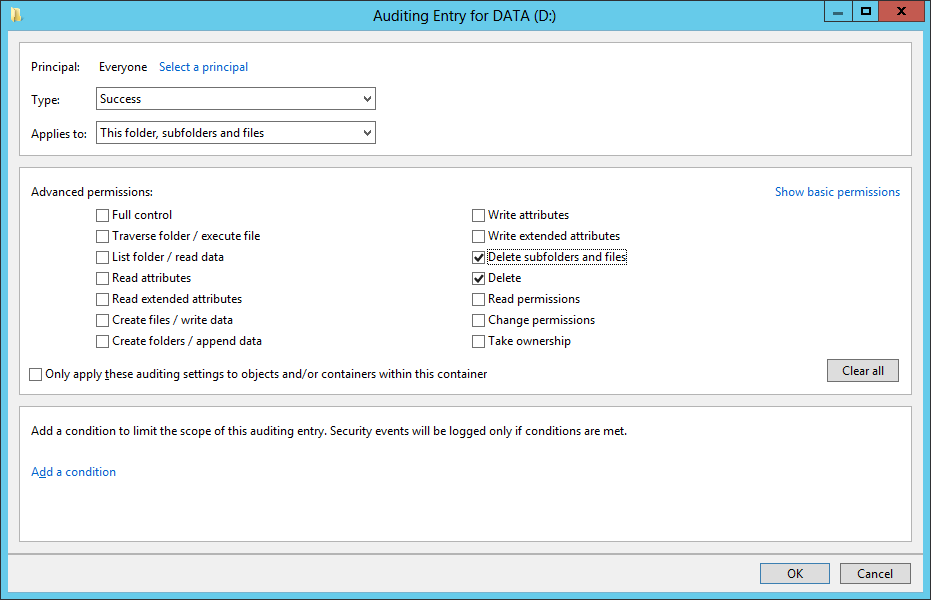
Now you need to setup Auditing on whole Disks or Folders:

Setup Auditing

When these settings in GPOs are applied there are new events in security event log. We need to look for event number 4659 and make some reporting out of it. I’ve created powershell script which I run every day right after midnight and it creates HTML report and also CSV files which can be used in some powershell manipulation. Here is a powershell script:

#
# Get-DeletedFileLog
#  This function gets events 4659 about delted files and generate HTML reports
#

#
# Declaration
#

[datetime]$Yesterday = ((Get-Date) - (New-TimeSpan -Day 1)).date
[datetime]$Today = (Get-Date).date
[int]$EventID = 4659
[string]$Path = "D:\Logs\Deleted Files"
[int]$Limit = (Get-Date).AddDays(-180)

Try
{
    #
    # Get events from security eventlog
    #
    [array]$EventList = Get-WinEvent -FilterHashtable @{Logname='Security';Id=$EventID;StartTime=$Yesterday} -Oldest -ErrorAction Stop

    #
    # Extend Event by XML data fields
    #
    foreach ($Event in $EventList)
    {
        $EventXML = [xml]$Event.ToXML()
        For ($i=0; $i -lt $eventXML.Event.EventData.Data.Count; $i++)
        {
            Add-Member -InputObject $Event -MemberType NoteProperty -Force -Name DateFileDeleted -Value $Event.TimeCreated
            Add-Member -InputObject $Event -MemberType NoteProperty -Force -Name UserName -Value $EventXML.Event.EventData.Data[1].'#text'
            Add-Member -InputObject $Event -MemberType NoteProperty -Force -Name DeletedFile -Value $EventXML.Event.EventData.Data[6].'#text'
        }
    }
    #
    # Generate HTML report
    #
    $EventList | Select DateFileDeleted, UserName, DeletedFile | ConvertTo-Html | Out-File "$($path)\$($Today.Year)$($today.Month)$($Yesterday.Day)_DeletedFiles.html"
    $EventList | Select DateFileDeleted, UserName, DeletedFile | ConvertTo-Csv | Out-File "$($path)\$($Today.Year)$($today.Month)$($Yesterday.Day)_DeletedFiles.csv"
}
Catch
{
    # If there is a problem
    Write-Host "No events $EventID to record."
}

#
# Remove old reports
#

Get-ChildItem -Path $Path -Recurse -Force | Where-Object { !$_.PSIsContainer -and $_.CreationTime -lt $Limit } | Remove-Item -Force

# EOF

This script also cleans up files older than 180 days. In HTML file you can see when, who and what deleted. I didn’t excluded files started with “~”, which are also known as temporary Office files, which are created during opening Office documents. This is because now I know who opened which files and when.

Enjoy,


Powershell script: Invoke-CommandOnADComputers

October 13th, 2014 No comments

Sometimes I need to run some command on bunch of computers. So I’ve created little bit more advanced function to be able to run script block on computers list created from domain:


<#
.Synopsis
   This function provides you way to run scriptblock on remote machines in the domain.
.DESCRIPTION
   This function is extension to Cmd-Let Invoke-Command. This function lists computer names in domain
   based on ADSearchBase and Filter parameters. In invoke scriptblock on those computers in the list.
.EXAMPLE
   To restart service "Windows Time" on all machines in domain:
   Invoke-CommandOnADComputers -SearchBase "DC=domain,DC=local" -ScriptBlock { Restart-Service W32Time; }
.EXAMPLE
   To restart service "Windows Time" on all machines which containt number 7 in name:
   Invoke-CommandOnADComputers -SearchBase "DC=domain,DC=local" -Filter 'Name -like "*7*"' -ScriptBlock { Restart-Service W32Time; }
#>

Function Invoke-CommandOnADComputers
{
    [CmdletBinding(SupportsShouldProcess=$True,ConfirmImpact='Low')]
    Param
    (
        # This is Active Directory Search Base to limit selection for computer accounts in domain.
        # It can be for example "OU=Computers,OU=Company Name,DC=domain,DC=local"
        [parameter(Mandatory=$true)]
        [string]
        $SearchBase,

        # Active Directory filter to merge your computer selection in to the detail.
        # It can be for example 'Name -like "Desktop*"'
        [string]
        $Filter = "*",

        # This is scriptblock which should be run on every computer.
        # For example { Restart-Service W32Time; }
        [parameter(Mandatory=$true)]
        [scriptblock]
        $ScriptBlock
    )
    Begin
    {
        #
        # Get list of computer accounts
        #
        Write-Verbose "Getting list of computer from $ADSear"
        try
        {
            [array]$ADComputersList = Get-ADComputer -SearchBase $SearchBase -Filter $Filter -ErrorAction Stop
        }
        catch
        {
            Write-Error -Message "Couldn't search in $SearchBase" -ErrorAction Stop
        }
        #
        # Write number of found computers
        #
        Write-Host "Found $($ADComputersList.Count) computers"
        #
        # If in debug, write list of computers
        #
        Write-Verbose "List of machines:"
        If (!$PSDebugContext)
        {
            foreach ($item in $ADComputersList)
            {
                Write-Verbose " $($item.Name)"
            }
        }
        Write-Verbose "Done with domain computer list"
    }
    Process
    {
        #
        # Let's invoke command on remote computer
        #
        foreach ($ADComputer in $ADComputersList)
        {
            Write-Host $ADComputer.Name
                try
                {
                    Write-Verbose "Invoking scriptblock on computer"
                    Invoke-Command -ComputerName $ADComputer.Name -ScriptBlock { $ScriptBlock } -ErrorAction Stop
                    Write-Host " Scriptblock invoked successful."
                }
                catch
                {
                    Write-Host " Scriptblock invoked UNSUCCESSFUL."
                }
        }
    }
}

You can run it using

Invoke-CommandOnADComputers -SearchBase “DC=domain,DC=local” -ScriptBlock { Restart-Service W32Time; }

and it will read all computer accounts from domain and restart Windows Time service.

Enjoy,

PowerShell: Script to check for logged users

September 16th, 2014 No comments

I’m creating couple powershell scripts which I use in my work. I want to share couple of them with you. So here is a script which look for domain computers and then check who is logged on those online machines.

$ADSearchBase = "OU=Computers,DC=domain,DC=local"
$ADFilter = "*"

Function Get-LoggedUsersOnComputers
  {
  $ADComputersList = Get-ADComputer -SearchBase $ADSearchBase -Filter $ADFilter
  foreach ($ADComputer in $ADComputersList)
    {
    Write-Output $ADComputer.Name
    Try
       {
       $ExplorerProcesses = Get-WmiObject -ComputerName $ADComputer.Name -Class win32_process -Filter "Name='explorer.exe'" -ErrorAction Stop
       }
     Finally
       {
       If ($?)
         {
         foreach ($ExplorerProcess in $ExplorerProcesses)
           {
           Write-Output "  $($ExplorerProcess.GetOwner().User)"
           }
         }
       Else
         {
         Write-Output "  <<< Could not connect"
         }
       }
    }
  }

Get-LoggedUsersOnComputers

If you have any remark on my script, please, let me know. I will be happy to make it more cute 🙂

Powershell Web Access

September 8th, 2014 1 comment

I was playing today with new feature called PowerShell Web Access. This feature was brought in Windows Server 2012. It is very easy to install and easy to use. You need to select one server which will act as Web Access PowerShell gateway server. You will be connecting to this server using SSL and this server will use PowerShell remoting to access computers inside your network. So let’s make it work.

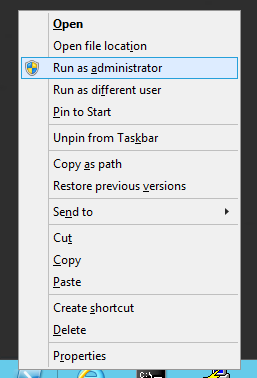
First you need to run PowerShell as a admin on gateway server:

PowerShell

Let’s look for Windows features which contain word “shell”:

PowerShell

Windows PowerShell Web Access is the feature we want to install. So let’s install it:

PowerShell

Now we can look at this website to lear more, but let’s play more. Now we have new cmdlets containig word “pswa” (PowerShell Web Access):

PowerShell

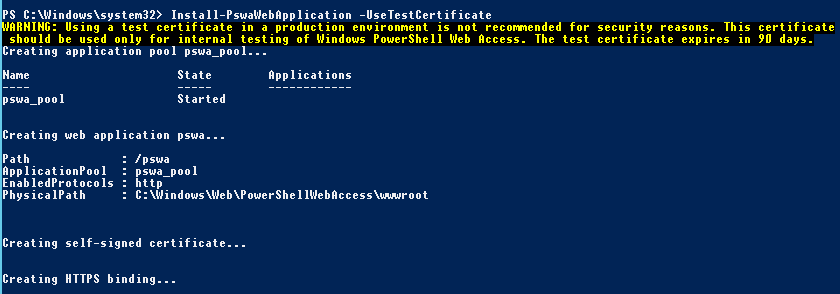
We installed pswa feature, but this feature didn’t install its web component into the server. So let’s install pswa Web application using cmdlet Install-PswaWebApplication with parameter -UseTestCertificate. This parameter creates self-signed SSL certificate for this new site, you can use your own certificate. Be aware that this certificate expires in 90 days.

PowerShell

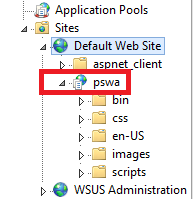
New website was created:

PowerShell

By default no one can use Powershell access gateway. You need to define explicit rules who, where and what can do. For easy test you can use following rule for domain group called GRP_PowerShell_Remote to access all computers with all permissions:

PowerShell

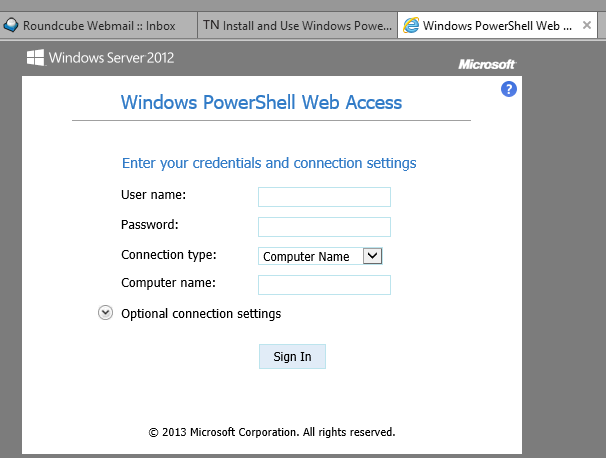
Now everything is prepared. We need to make some changes in network (routers and NAT) to be able to access 443 port on server from Internet. Now when we open site, we can see:

PowerShell Web Access

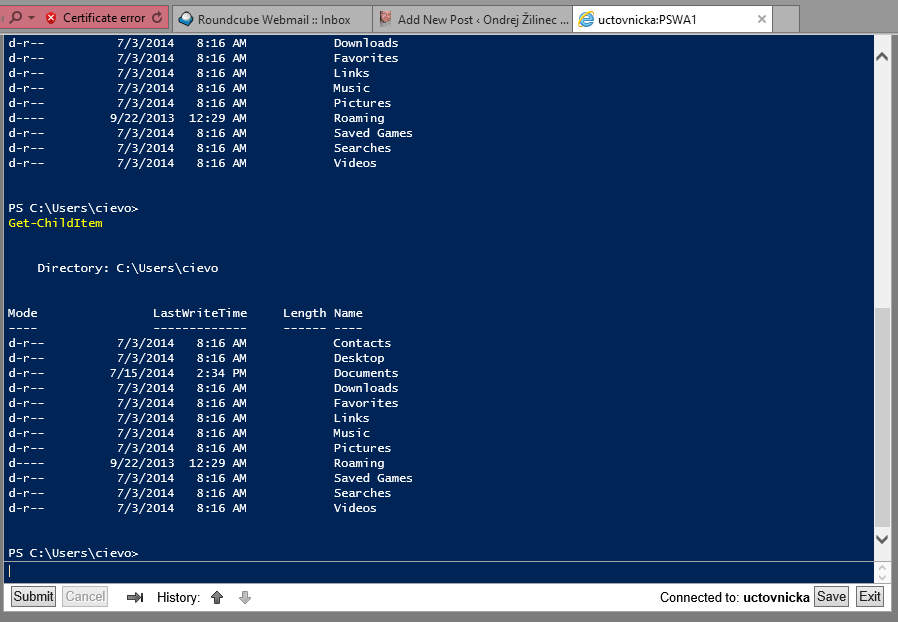
And now you can work on machines inside your network. It’s secure and reliable:

PowerShell

This is very nice and cute feature.

I hope you will start to use and enjoy it.

Have a nice day.


Remote Powershell in domain environment

March 21st, 2014 3 comments

Sometimes you need to run some command on remote computer. If you don’t want to bother user using Remote Assistance or user is not at the computer you can try Remote Powershell. Powershell was new feature when Windows Vista and Windows Server 2008 came. So we can divide operating systems into three categories. Each category requires some things and some requirements.

Windows 7 / Windows Server 2008 R2 and higher

  • Needs to open ports in firewall (is your firewall is not open all the way)
  • Needs to enable and configure WinRM
  • Needs to configure WinRM service to run

Windows Vista / Windows Server 2008

  • Needs everything from first group
  • Needs to install PowerShell 2.0

Windows XP / Windows Server 2003

  • Needs everything from second group
  • Needs to install .NET Framework

Probably your environment will be mixed of all three types of operating systems. So let’s look how to configure it. I will use GPOs everywhere it can be used.

Enable Remote PowerShell for Windows Vista and Windows Server 2008

Create GPO and set following:

Computer Configuration > Policies > Administrative Templates > Windows Components > Windows Remote Management (WinRM) > WinRM Service > Allow automatic configuration of listeners (Allow Remote Server management through WinRM):

Firewall exceptions

Firewall exceptions for Windows 7 / Windows Server 2008 and higher

If you have Microsoft firewall closed and you need to make exception using GPO in Computer Configuration > Policies > Administrative Templates > Network > Network Connections > Windows Firewall > Domain Profile > Windows Firewall: Define inbound port exceptions:

Firewall exceptions for Windows XP / Windows Server 2003

You have to define New Firewall rule under Computer Configuration > Policies > Windows Settings > Security Settings > Windows Firewall with Advanced Security > Windows Firewall with Advanced Security > Inbound Rules and create new Inbound rule with predefined type “Windows Remote Management”:

Configure Service

To enable Remote Powershell I need to configure service. WinRM service has to start automatically. Create new setting in GPO in Computer Configuration > Policies > Windows Settings > Security Settings > System Services. Setup service Windows Remote Management (WS-Management) following way:

Let’s change startup for this service using GPO settings under Computer Configuration > Preferences > Control Panel Settings > Services. Create new Service setting with following settings:

Windows XP / Windows 2003 specialities

To make Powershell work remotely on older operating systems you need to make sure your operating systems have installed two hotfixes: KB968930 and KB951847. These hotfixes are distibuted via Windows Updates so if you use WSUS, there updates are already on your older operating systems.

To enable PowerShell for remote connection you need to enable it using startup script. So you need to create new GPO which will run only on older OS. You can use following WMI filter to make this GPO apply only on older OS:

You can use following script as a startup script to enable Powershell Remote for Windows XP.

To test it you can run following command:

Enter-PSSession -ComputerName COMPUTER_NAME

Active Directory Users and Computes Implementation

To make it look better you can implement connection to computer using Active Directory Users and Computers.

On location \\domain.local\NETLOGON create new Powershell.vbs file:

' ' Script to run Remote Powershell on domain computer '

Set wshArguments = WScript.Arguments Set objComputer = GetObject(wshArguments(0))

' ' Check if Remote Assistance is installed '

Set fso = CreateObject("Scripting.FileSystemObject") 
If (fso.FileExists("C:\Windows\system32\WindowsPowerShell\v1.0\powershell.exe")) Then  
' Is istalled  
   Set objShell = WScript.CreateObject("WScript.Shell")  
   Return = objShell.Run("C:\Windows\system32\WindowsPowerShell\v1.0\powershell.exe -noexit \\domain.local\NETLOGON\Remote_Session.ps1" & objComputer.dNsHostName, 1, false) 
Else  
   ' Is not installed, error.  
   Wscript.Echo "Microsoft Remote PowerShell is not enabled on this machine." 
End If

On location \\domain.local\NETLOGON create new Remote_Session.ps1 file:

[CmdletBinding()]
Param(
  [Parameter(Mandatory=$True,Position=1)]
   [string]$computerName
)

Enter-PSSession -ComputerName $computername

 When files are ready, you need to create new record in Active Directory using adsiedit.msc. Connecto to configuration partition of your domain:

Go to Configuration > CN=Configuration,DC… > CN=DisplaySpecifiers > CN=409 > CN=computer-Display and edit property called adminContextMenu.

Add another record into existing list of records. I used following record:

3, &PowerShell Remote,\\domain.local\NETLOGON\Powershell.vbs

which means:

3 – order of record in the list of records (if you have only one existing record, your number will be 2)

&PowerShell Remote – name of the item in context menu

\\domain.local\NETLOGON\Powershell.vbs – path to vbs script you created

Here is how it looks in one of the environments:

When all is done, your Active Directory Users and Computers console has to be reopened and you will find new record under computer account:

When you click on this new item in context menu new powershell window opens. This powershell window is remote powershell windows from remote computer.

I hope people start using powershell more often,
Quickie: Tail in Powershell

February 28th, 2014 2 comments

There is lots of great tools in Linux which are needed in Windows environment. One of the great tool from linux is “tail”. You can use it following way:

tail -f /var/log/mail.log

You will get end of the file and you see all content added to file on screen. You can view log files without need to reopen it. In Windows I use utility Trace32.exe. I was looking for some more native way to do it in Windows. There is a cmd-let Get-Content in Powershell which you can use following way:

Get-Content C:\Windows\WindowsUpdate.log -Wait -Tail 10

This tails only 10 lines from the end of the file and “waits” for new added lines. Switch “Tail” is accessible only in PowerShell 3 and higher.

Powershell is getting there,

Powershell script to change User Principal Name to Primary SMTP Address

October 2nd, 2013 No comments

When you install Exchange in environment you want to allow users to log into mails using their e-mail address. If your domain name is different from your e-mail domain, you have to add UPN suffix first. More abour it HERE. Then you need to change User Principal Name into Primary SMTP Address. I wrote little script to do so:

Get-Mailbox |
  ForEach-Object{
   Write-Host “For: ” + $_.SamAccountName
   Write-Host ”   – change UPN from: ” + $_.UserPrincipalName + ” to: ” + $_.PrimarySmtpAddress
   Set-ADUser -Identity $_.DistinguishedName -UserPrincipalName $_.PrimarySmtpAddress
 }

Have a nice day,

Categories: Exchange, Microsoft, Powershell Tags: ,

Quickie: Powershell not just for work

June 21st, 2013 No comments

I installed Microsoft Lync couple monts ago at one customer. He asked me when his licence will expire. I knew date when Lync was installed (28/2/2013) and expiration period for Microsoft Lync server (180 days). I used power of shell (powershell) to check it out:

Get-Data AddDays

How cool is that? I really love powershell 🙂

Categories: Powershell, Quickie Tags: ,

Exchange read-only mailbox rights

April 11th, 2013 1 comment

Couple of days I’ve got question from my friend if there is way to setup Exchange mailbox to be Read-only for other users in company. I never needed it, because when someone else needed to access other’s mailbox, I just set FullAccess rights on mailbox and everythin worked fine.

Testing scenario

Exchange 2010

Tester user called Tester with following content of mailbox:

Tester mailbox

Tester user called Tester02 wich wants to access whole mailbox of user Tester, but Read-only.

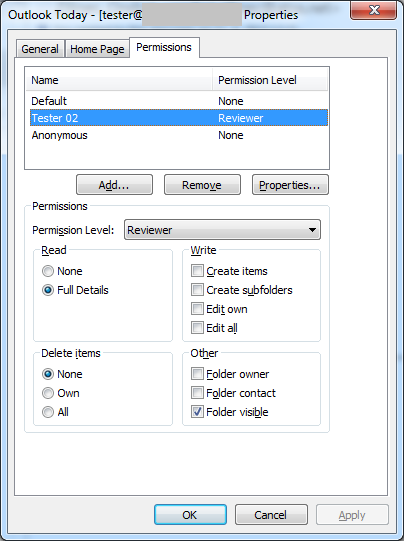
When I set Reviewer for user Tester02 on mailbox Tester under Outlook:

Reviewer permissions

Problem

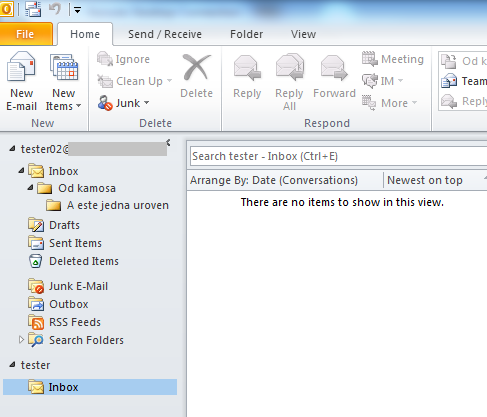
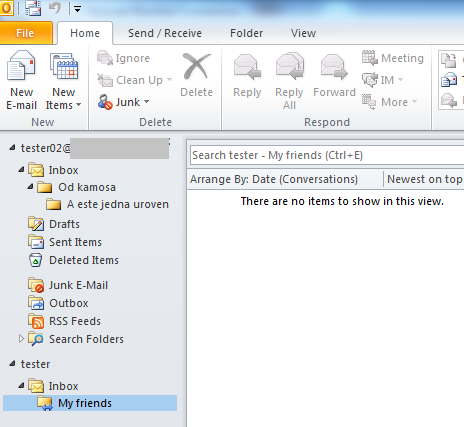
When I connect Tester’s mailbox into Tester02’s Outlook profile I can see following:

Inbox view

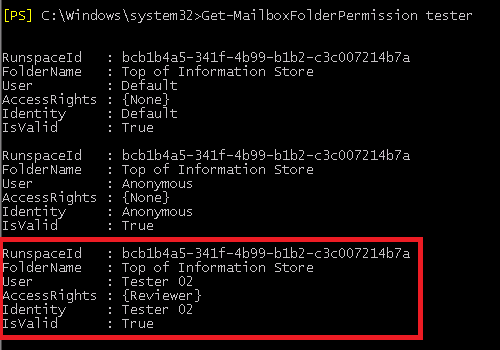
So I can see only Inbox. I don’t see any folder underneath it. We can check this permissions also using Powershell:

Get-MailboxFolderPermission

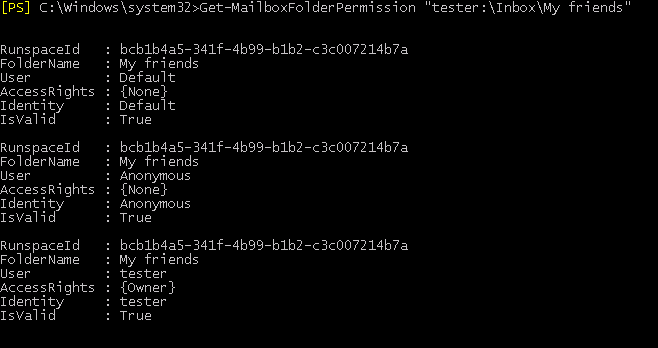
When we look on mailbox folder permissions underneath Inbox, for example “Inbox\My friends” folder, we can see following:

Permission on subfolder

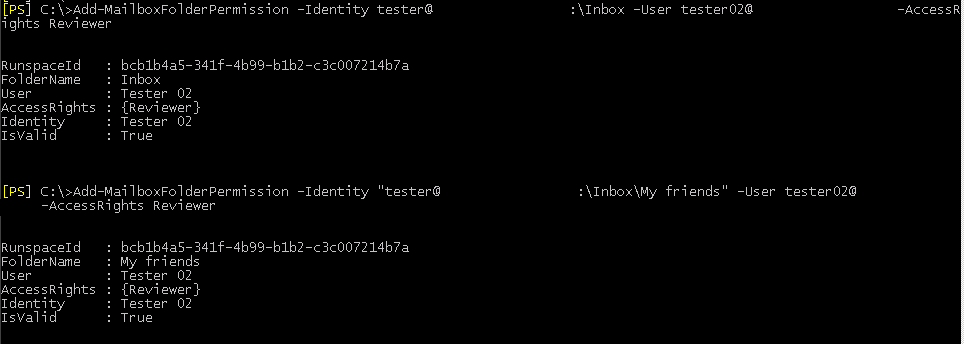
This means that mailbox folder permissions are not inherited. So we can set permission per folder. So let’s test to add permission to folder Inbox and subfolder “My friends”:

Set-Folder Permissions

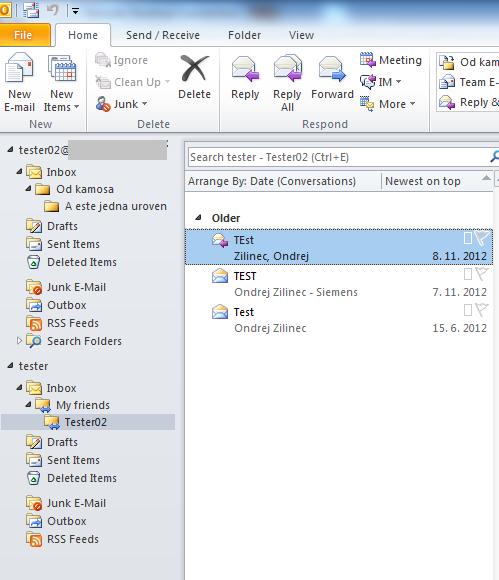
and now we can see also subfolders under account Tester02:

Accessible subfolders

This means that using Outlook or powershell commandlet Add-MailboxFolderPermission can set permissions only on one folder and these settings are not inherited! This is really weird. I couldn’t find any setting to allow inheritance.

Another way to set permissions of mailbox folders is set permissions on whole mailbox. This can be set by users which have rights to manage exchange mailboxes. Let’s look on powershell cmd-let Add-MailboxPermission. This cmdlet allows you to set just following access rights: FullAccess, SendAs, ExternalAccount, DeleteItem, ReadPermision, ChangePermision and ChangeOwner. Neither one of these rights define Read-only access to mailbox.

Solution

So there is no easy way to share whole mailbox between users in read-only manner. Only way I can think of is to run some powershell script. For example:

Add-MailboxFolderPermission tester -User tester02 -AccessRights Reviewer


ForEach($folder in (Get-MailboxFolderStatistics -Identity tester) )

{

$fname = “tester:” + $folder.FolderPath.Replace(“/”,”\”);

Add-MailboxFolderPermission $fname -User tester02 -AccessRights Reviewer

}

where “tester” is account with shared mailbox and “tester02” is account which want to access shared mailbox.

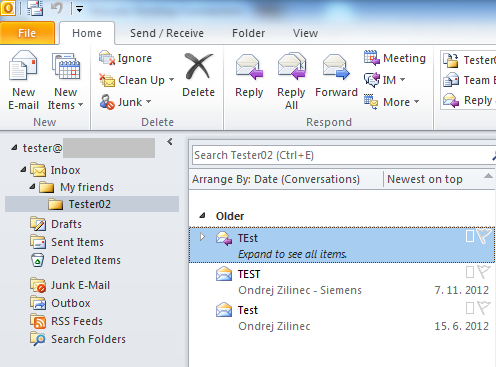
After this powershell commands are done, Tester02 can see Tester’s mailbox:


Shared mailbox accessible


But when user Tester creates new folder in his mailbox, user Tester02 will not see it unless user Tester sets permissions on new mailbox folder.

I hope guys from Microsoft will solve this issue in next release of Exchange. 🙂