Archive

Archive for the ‘Computer network’ Category

Easy Layer 2 Site to Site VPN

January 17th, 2025 No comments

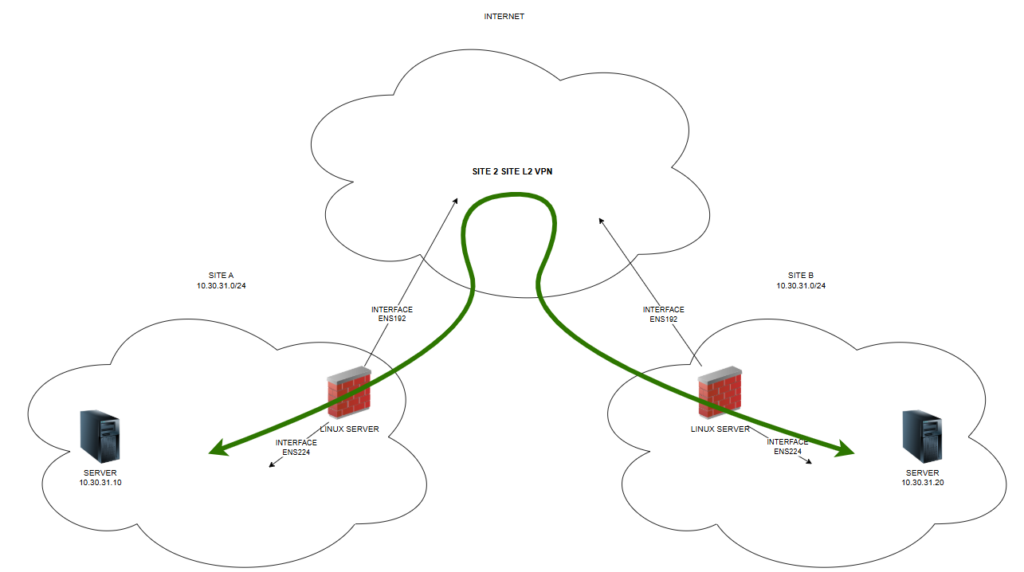
When you need to connect two sites with same IP subnet, you need to create Site to Site VPN on Layer 2. It means you need to create non-routing VPN between sites. Let’s assume we have following setup:

Easy network schema

We need to make sure, that computer 10.30.31.10 can access computer 10.30.31.20 and vice-versa.

We need to install two linux servers. I love Debian distribution. So I have installled two Debian servers on both sites. Both servers have two interfaces:

ens192 – first interface which is used to connect for SSH. It has IP address and it working interface

ens224 – second interface which is in LAN we want to connect. It acts as TAP interface – like cable put into LAN without IP settings. This interface is only up.

You will make SSH connection from one site to another – it means one server has to be accessible from other site. I published TPC/22 (SSH) port from SITE B on Internet. So I could connect from Debian server from SITE A to SSH on Debian server in SITE B. You need to install following packages on Debian:

uml-utilities
bridge-utils
net-tools

Run following commands on both linux servers:

echo 1 > /proc/sys/net/ipv4/conf/all/proxy_arp
echo 1 > /proc/sys/net/ipv4/ip_forward

and make those settings pernament running command:

sysctl -p

On server which will do SSH server you need to change in SSH config file /etc/ssh/sshd_config following settings:

PermitRootLogin yes
PermitTunnel yes

Now are are ready to make SSH connection between linux servers. You have to run following command on “ssh client” server to make connection on “ssh server” server:

ssh -f -o Tunnel=ethernet -o TunnelDevice=0:0 -w 0:0 root@IP_SSH_SERVER true

This command makes SSH connection between linux servers and it creates special interfaces on both linux servers. These interfaces are called tap0. Now we need to bridge interfaces to make VPN work. We have to run following commands on BOTH servers:

Create bridge interface:

brctl addbr br0

Add “cable” interface ens224 and VPN TAP interface into bridge:

brctl addif br0 tap0
brctl addif br0 ens224

And now put all those interfaces up:

ifconfig ens224 up
ifconfig tap0 up
ifconfig br0 up

Now all connection is set and Site to site VPN works as sharm. I never thought it was that easy to create such a connection.

If you have VMWare, settings needed:

VMWare Settings

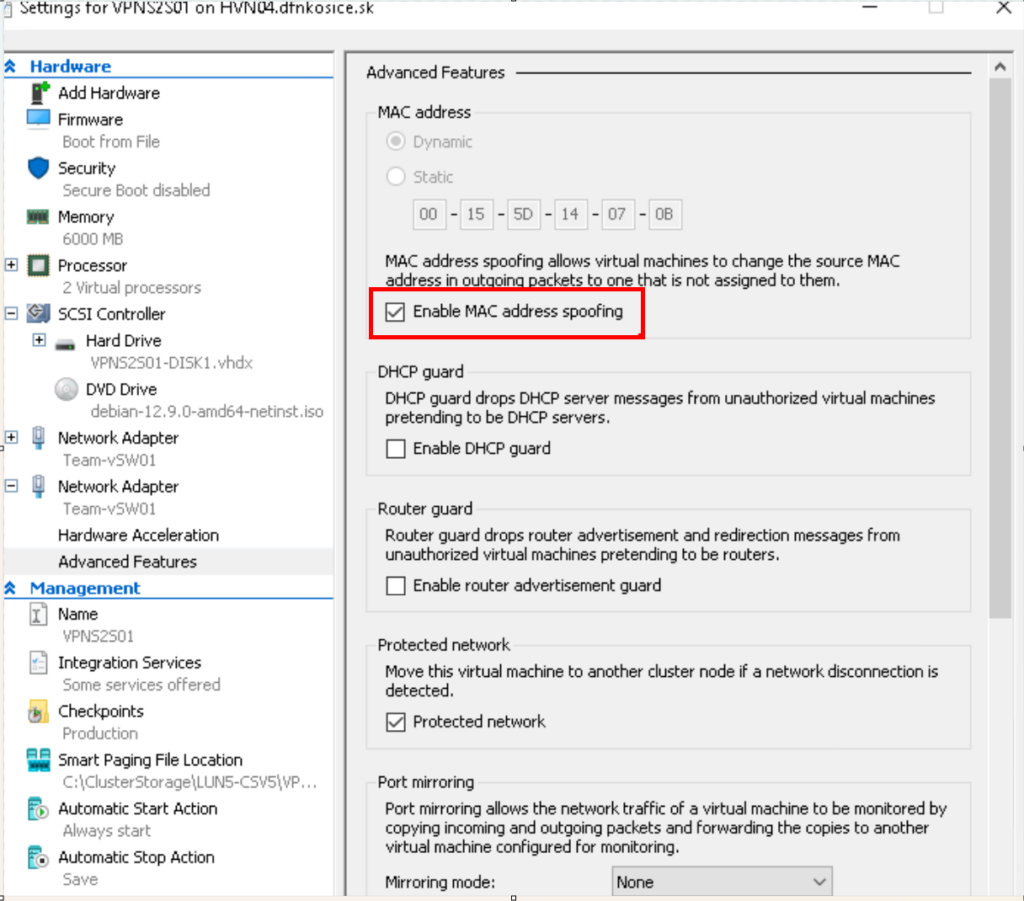
If you have Hyper-V, settings needed:

Hyper-V settings

Enjoy.

Thank all folks,

Windows 7 unable to connect to Wifi with WPA2-Enterprise (802.1

October 28th, 2021 No comments

I have deployed WPA2-Enterprise authentication on network. Computer should use computer certificate to authenticate to Wireless network. I deployed NPS server, configured all requirements. Windows 10 didn’t have problem to connect to Wifi network. Windows 7 computers have problem.

Problem

In eventviewer (Applications and Services Logs\Microsoft\Windows\WLAN-AutoConfig) I found following error:

Network Adapter: Intel(R) Centrino(R) Advanced-N 6205
Interface GUID: {c2c428cb-76cc-4474-a043-33ce2bfe9f0d}
Local MAC Address: 60:67:20:a6:42:63
Network SSID: SECURE_WIFI
BSS Type: Infrastructure
Peer MAC Address: 34:1F:a2:AF:C8:1E
Identity: DOMAN\USER1
User: USER1
Domain: DOMAIN
Reason: Explicit Eap failure received
Error: 0x80074005
EAP Reason: 0x4005
EAP Root cause String:
EAP Error: 0x4005

Solution

Problem is very weird. When you install NPS server, NPS server will use certificate to proof of identity. By default it uses certificate created from Windows CA Template called Kerberos Authentication. This certificate has empty attribute called Subject.

Windows 7 has problem that it doesn’t accept certificate with empty Subject attribute. Other OS’s worked fine. Solution to make it work is to populate this attribute into certificate. You can do it following way:

  • Go to Certificate Template console (use MMC, add snap in –> Certificate Templates) and change template called Kerberos Authentication.
  • Open properties of this template
  • Go to Subject Name tab
  • Change Subject name format to DNS name

Now go to NPS server. Open the Certificates MMC (Computer), go to Personal / Certificates and right click in the details pane – All Tasks / request New Certificate. Request new certificate from template Kerberos Authentication for computer account:

After new certificate is installed under computer certification store, you can find attribute Subject populated with DNS name of NPS server:

When certificate is OK, you can change certificate which should be used to proof identity.

Let’s make new certificate work on NPS server. Open NPS console. Go to Network Policies and open up your policy which handles 802.1x requests. Go to the Constraint tab, Authentication Methods / PEAP and click on Edit.

The certificate expiry date now shown should tie in to the one you just created:

Now also Windows 7 will connect to wireless network with no problem and not error event 🙂

That’s all fokls,

Windows port forwarding

November 3rd, 2020 No comments

I didn’t know that it’s possible in Windows TCP/IP stack make port forwarding. I knew it’s possible in Linux using iptables. In windows we have powerful tool called netsh.

Let’s have a example. Some service is listening on port TCP/10000. If I want to make this service listen on other port than TCP/10000 and there is no configuration to change I will use netsh to make it happen. Let’s look at listening ports on TCP/10000 and TCP/20000:

netstat before netsh

We can see there is no port listening on TCP/20000. Let’s make a magic and run command:

netsh interface portproxy add v4tov4 listenport=20000 listenaddress=0.0.0.0 connectport=10000 connectaddress=192.168.100.118

You cannot use loopback or 0.0.0.0 in connectaddress parameter. You can even use remote server IP address in connectaddress parameter.

Let’s look at netstat commands:

netstat after netsh

If your command doesn’t work, please, check if service called IP Helper is Running.

To see all configuration of portproxy settings just run following command:

netsh interface portproxy dump

netsh interface portproxy dump

To delete rule just run following command:

netsh interface portproxy delete v4tov4 listenport=20000 listenaddress=0.0.0.0

And that’s all folks,

Problem with MTU

April 15th, 2015 2 comments

Problem

One of our customer has two branches. There is Site-2-Site VPN (based on Cisco ASA devices) between those two branches. There was weird problem when traffic went through that Site-2-Site VPN tunnel. Some communications were fine, but most of them didn’t work. Problems that we noticed:

  • OutlookAnywhere didn’t work
  • Domain controllers from both sides couldn’t replicate
  • HTTPS connections didn’t work
  • ESX client didn’t connect to ESXi server via tunnel (Call “ServiceInstance.RetrieveContent” for object “ServiceInstance” on Server…)

Solution

Change MTU on computer to something lower than 1500 MTU. You can use following commands:

netsh int ip show int

netsh interface ipv4 set subinterface “Local Area Connection” mtu=1300 store=persistent

If everything works, you need to adjust MTU on Cisco ASA devices. There is great article about it HERE. We used Method 2.

This change made local administrators very very very happy 🙂

Categories: Computer network Tags:

Acer notebooks and IP 192.168.0.10

March 13th, 2015 5 comments

Our customer bought Acer notebooks and he started to have problem with management server 🙂 Management server has IP address 192.168.0.10. When I checked ARP responses other server using WireShark I found out that there are 10 ARP records for IP address 192.168.0.10. So there were IP conflicts.

WireShark ARP conflict

Customer has IP range 192.168.0.0/23 and management server has IP 192.168.0.10. Problem is that this stupid Acer Notebooks have same IP address 192.168.0.10 for their ASF and it’s enabled by default.

You can disable/configure ASF using BIOS:

  1. Go to BIOS -> Advanced -> Integrated Peripherals
  2. Set “ASF” to Disabled
  3. Save BIOS settings and restart PC

Have a nice day and don’t buy Acer 😀


How to implement Web Proxy Auto-Discovery Protocol

April 8th, 2014 4 comments

Web Proxy Auto-Discovery Protocol known as WPAD is protocol used by web browsers to locate URL of configuration file using DHCP or DNS.

How does it work?

Computer running web browser must be configured to detect settings automaticaly. It can be turned on in Internet Explorer:

When this browser starts it detects WPAD URL. If browser supports DHCP discovery it will send DHCPINFORM query on network asking for WPAD option. If client doesn’t get DHCP answer it will try DNS query. Let’s assume we have local domain expo.domain.local. Client will try following URLs:

  • http://wpad.expo.domain.local/wpad.dat
  • http://wpad.domain.local/wpad.dat

When this DNS is not successful browser will try URL with NetBios name http://wpad/wpad.dat.

This behaviour can depend on WPAD implementation in browser. Some browser doesn’t use DHCP detection. Some will try also http://wpad.local/wpad.dat URL. I will write only about Internet Explorer behaviour.

Finally when browser gets wpad.dat file from WPAD URL it will parse this file and set proxy settings described in wpad.dat file.

How to make it work?

Let’s assume we have DHCP and DNS services running on Windows Server. We also need IIS installed on server. First of all we need to create new IIS Website:

We will bind this website to port 80 and Host name will be set to wpad.domain.local. We will create new directory C:\inetpub\wpad where website will point. Second, we need to define new MIME type in IIS. Click on IIS server name in IIS console. Then click on MIME Types:

On right side click on action Add.. and define new MIME type (.dat – application/x-ns-proxy-autoconfig):

In directory C:\inetpub\wpad create new file called wpad.dat with following content:


function FindProxyForURL(url, host) {

if(shExpMatch(url,"*intranet/*")) { return "DIRECT"; }

if(shExpMatch(url,"*.domain.local/*")) { return "DIRECT"; }

if(shExpMatch(url,"10.0.*")) { return "DIRECT"; }

if(shExpMatch(url,"192.168.*")) { return "DIRECT"; }

// DEFAULT RULE: All other traffic, use below proxies, in fail-over order.

return "PROXY 10.0.0.100:8080";

}

This file is in format Proxy auto-config (PAC file) and it is self-explanatory. It’s kind of fucntion which says if URL is “*intranet/*, “*.domain.local/*,… browser will go directly to this URL. Those are proxy exceptions. Other not defined traffic will be send to proxy server 10.0.0.100 and its port 8080. This script can be more advanced. Be aware, if you make some mistake some stupid browsers (including Internet Explorer) will skip whole script and not use it 🙂

Now when we have our wpad.dat file ready we can try if we are able to download it using browser. Just try if you can download file http://wpad.domain.local/wpad.dat.

If everything works let’s inform browsers we have published autoconfiguration file.

Publish in DHCP

We need to create new DHCP Option 252 first:

  • Open DHCP Console
  • Right click on DHCP server and select Set Predefined Options and then click Add
  • In Name type wpad, Data type select String and Code type 25

  • Click OK
  • Enter value http://wpad.domain.local/wpad.dat in Value String field
  • Click OK
  • Right-click on Scope Options in DHCP scope where you want add DHCP value 252 and select Configure Options…

  • Scroll all the way down and select DHCP value 252 and click OK

This is all for DHCP setup. Let’s look on DNS setup.

Publish in DNS

You need to create DNS A record wpad.domain.local and point it to IP where WPAD Website runs. Windows servers will not answer on DNS A “wpad” requests. It’s basically for security reason. “wpad” is blocked in DNS by default. In default DNS block list are two records: wpad and isatap. To enable wpad we need to left only isatap in block list. You can do it by command dnscmd /config /globalqueryblocklist isatap.

Remember

  • If browser has DHCP discovery and get some DHCP Option 252, it will not do DNS discovery
  • Some browsers don’t support DHCP discovery. Only Internet Explorer and Konqueror support both the DHCP and DNS discovery functions

That’s all folks for today 🙂

News in DHCP client since Windows 7

September 26th, 2013 No comments

Imagine you have DHCP server on network. You have all Windows XP and older clients. When DHCP server was not accessible on network during client’s startup, client computer couldn’t get IP address and it assigned APIPA address. This was a problem. So let’s look what’s new since Windows 7.

I prepared following scenario:

  • One DHCP server Windows Server 2012 – 192.168.0.10
  • One DHCP server Windows Server 2012 acting as default gateway – 192.168.0.11
  • One Windows 8 client – DHCP assigned
  • One Windows 7 client – DHCP assigned

When I client wants to get TCP/IP settings from DHCP server, there are four DHCP packets (DISCOVER, OFFER, REQUEST and ACK) going on network. Network dump on DHCP server:

This is normal behaviour even in old clients. Now I shutdown client and stop DHCP server. When I started client computer I found out that client computer has IP address it received from DHCP server before reboot.

So let’s restart client again and see what happends. Client computer has same TCP/IP settings, it had before reboot (TCP/IP settings received from DHCP server before I stopped DHCP server). Client computer keeps asking DHCP server to renew TCP/IP settings (using DHCP REQUEST):

So how client computer knows if it has to set cached TCP/IP settings before DHCP server stopped to respond? I assume it depends on gateway and its IP or MAC address. So let’s disconnect gateway from network and reboot client computer. Now client has APIPA TCP/IP settings and it looks for DHCP server by DHCP DISCOVERY:

It means it depends on health of gateway if client keeps TCP/IP settings assigned by DHCP or not. I haven’t seen any ICMP packet to check network healt of gateway so I assume it check MAC address. So let’s look for ARP packets from client to gateway. Looks like client asks for MAC address of saved default gateway IP address. When it received answer, it sets TCP/IP settings to cached TCP/IP settings:

Question is if client computer compares MAC address to some saved one or it just waits for ARP response and doesn’t care of MAC address. Let’s change MAC address of default gateway. Client keeps asking via ARP for MAC address. MAC address is different and client doesn’t set its saved TCP/IP settings (it sets APIPA settings):

So where client computer saves MAC address of default gateway?

Yes, in registry. 🙂 It’s saved under registry key:

and there are subkeys for each interface and under this key there is binary value called DhcpGatewayHardware which contains MAC address:

When client starts it checks for MAC address of its saved default gateway IP address. Then it compares to saved MAC address from registry. If these two MAC addresses don’t match, client deletes all saved TCP/IP settings from registries and uses APIPA (if there is not Alternate Configuration). In background it still looks for DHCP server by sending DHCP DISCOVER packets.

So now we have smaller problem on Mondays when DHCP server is down (of course by accident 🙂 ) and everyone is trying to get to network resources 🙂

I haven’t find any article about this new behaviour on oficial Microsoft websites.

That’s all folks,


ARP protokol alebo ako sa stat guru u zakaznikov

June 6th, 2013 3 comments

Uz dlhsie som rozmyslal ci napisat dany clanok a az teraz som sa rozhodol, ze ano. A ze dokonca bude po slovensky 🙂 aj ked bez diakritiky. Pokusim sa vam popisat tri situacie ked som bol povolany do boja proti neposlusnej sieti. A taktiez ako som ich poriesil pomocou porozumeniu ARP protokolu (Address Resolution Protocol).

1. pripad

Bol to moj prvy pripad v terajsom zamestnani. Zakaznik mal siet o rozsahu 192.168.0.0/24. Dosli mu IP adresy, tak sa rozhodol rozsirit IP rozsah zmenou sietovej masky na /23. Cize servery na serveroch a aktivnych prvkoch, o ktorych ITckari vedeli, prehodli sietovu masku na /23. Taktiez na DHCP pool-e zmenili sietovu masku na /23. A vtedy sa zacali problemy. Prejavovalo sa to nasledovne. Ked na klientskom PC dali pingat IP adresu servera, tak presli 2 pingy a 3 sa stratili, 2 pingy presli a 3 sa stratili,…atd. Bolo to zaujimave. Nastartoval som WireShark a napisal filter ARP. Vtedy som si vsimol nieco zaujimave na sietej komunikacii. Zacal som pingat server na lokalnej sieti. Predtym ako sa poslal ICM Request, tak sa poslal ARP Request. Dostal som ARP Reply, naco som nasledne poslal ICMP Request na MAC adresu ziskanu ARP Reply (MAC adresa servera). Po dvoch ICMP Requestoch dosla dalsia ARP Reply z uplne inej MAC adresy ako bola MAC adresa servera. A kedze Windows very kazdej MAC Reply (vsak ako by sme robili Man-In-the-Middle?), tak zacal moj komp posielat ICMP Request na novu MAC adresu. A ta, samozrejeme, neodpovedala. Takze preto par pingov preslo a par nepreslo.

Riesenie

Problem spocival v tom, ze lokalny ITckari nezmenili IP rozsahy na vsetkych zariadeniach. Zabudli na to, ze maju v sieti este nejake zabudnuty Cisco router a na tom nezmenili sietovu masku. A na Cisco zariadeniach je defaultne zapnute Proxy ARP. Kedze si zakaznik rozsiril IP rozsah, a klientsky DHCP pool sa presunul do noveho rozsahu, mimo 192.168.0.0/24, tak pre Cisco routery tieto IP adresy boli mimo ich rozsah, takze sa chovali presne ako sa od nich ocakava, ked je zapnute Proxy ARP. Cize podvrhuju svoju MAC adresu, pretoze sa “pokusia” dorucit paket pre IP adresy mimo ich lokalny rozsah. Viac o Proxy ARP.

2. pripad

Inokedy som bol prizvany ku dalsiemu problemu. Popis od zakaznika znel tak, ze blbne im IP telefonia a Slovak Telecom, od koho mali IP Telco ustrednu, nema ziaden problem. Ze maju vsetko zelene 🙂 Tak som vyrazil na hodinovu cestu. Pri dojdeni na miesto som sa pozeral na zaujimavy stav. Stal som v kancelarii a telefony blikali ako v zlom filme o hackeroch 🙂 Zelene telefony boli v poriadku a svietiace na cerveno boli v zlom stave. Ich stavy sa nahodne menili a blikalo to cele v kancelarii ako ked sa strasny hacker infiltruje do siete FBI 🙂 Tu som bol za guru ako nikdy predtym, pretoze som zapol notebook, nastartoval WireShark, nastavil IP adresu z rozsahu pre IP telefoniu a hned po cca 20 paketoch ARP protokolu som videl nasledovne:

IP duplicity

Riesenie

Takze bolo potrebne len vystopovat danu MAC adresu, ktora mala nastavenu rovnaku IP adresu ako IP telco ustredna a vsetko bolo v poriadku. Na koniec sme zistili, ze dana MAC adresa patrila jednemu ITckarovi 😀 Takze sumar dna: 1 hodina cesta ku zakaznikovi, 10 sekund najdenie dovodu vypadkov, 2 minuty najdenie pachatela, 30 minut vymyslanie pribehu pre management a 1 hodina cesta domov 🙂

3. pripad

Bol to rovnaky zakaznik ako v pripade cislo 2. Mali problem s citackami ciarovych kodov v sklade. Pri telefonate som zistil, ze citacky ciarovych kodov maju v rovnakej VLANe ako PCcka a telefoniu. Problem bol, ze vypadavalo z citaciek pripojenie na SAP server v serverovej VLANe. Ked sme dali pingat dany server z klientskeho PC, tak vypadavali pingy na server a dokonca aj na vlastnu default gateway. Router nemal ziadne vytazenie (<1%). Co bolo divne. Takze sme nastartovali WireShark. A pri zadani filtra ARP som spozoroval, ze pomedzi ARP spravy, ktore tam mali byt som videl ARP spravy tykajuce sa IP rozsahu VLANy v ktorej su tlaciarne a tlacovy server. Co bolo celkom divne. Tak som si nastavil druhu IP adresu z rozsahu tlacovej VLANy a zistil som, ze ked pingnem tlacovy server, tak idem na priamo a nie cez router. Takze problem bol detekovany hned, mali domiesane VLANy.

Riesenie

Ked som si nastavil druhu IP adresu z rozsahu tlacovej VLANy, tak som mohol na switchoch dohladat kde sa dane VLANy domiesali/zoskratovali. 🙂 Takze siel som switch za switchom az som dosiel na nejaky lacny TP Link na ktorom bol vypnuty Spanning Tree Protocol. Tak som ho skonfiguroval a zrazu sa siet prebrala a zacala robit co mala. Pri dalsej analyze som zistil, ze u zakaznika mala dojst nejake navsteva a kedze upratovali nezapojene LAN kable, tak iniciativni ludia ich pozapajali kde prislo. Tym sa zmiezali VLANy a taktiez sa spravili slucky na switchoch, ktore nemali STP zapnuty a tak vznikali slucky/broadcast stormy a dalsie prejavy “zoskratovaneho prepinaca”.

Takze tolko som sa chcel podelit s mojimi skusenostami ako sa stat sietovym guru v ociach zakaznika. Dokonca niektore problemy poriesit do 5 minut 🙂 Samozrejme sa musim podakovat mojemu dobremu ucitelovi sieti, ktory mi dal velmi dobre zaklady – Peter Palúch. Dakujem Peto!
Quickie: Kerio has also some bug

March 14th, 2013 No comments

Today I solved one network issue. Customer has Tomcat webserver. This server is located at central site. Users which use this Tomcat website are located at branches. These branches are connected via MLPS network. There is Kerio in between MPLS network and central site. Problem was that people from central site could use Tomcat website, but people from branch offices couldn’t use it. After couple minutes of analyzing network using Wireshark, I found out that problem is caused by IP fragmentation.

I solved it by Enabling PMTU black hole detection and Disabling PMTU Discovery as described HERE.

I found also old article about this issue at Kerio support forum.

Quickie: GetMac.exe

November 30th, 2012 No comments

I was just browsing Internet a looking for built-in utilities in Windows. I found one nice one getmac.exe which can get the list of MAC addresses on local or remote computer. It’s nice utility and it’s better to use it to find out MAC addresses, because looking into ipconfig /all verbose output is very time consuming (look in it when IPv6 is enabled). 🙂

Also ipconfig cannot be run on remote machine without using other utility (for example psexec).

More information here.