Archive

Author Archive

Quickie: How to delete registry using reg file

June 6th, 2014 No comments

I always used .reg files to import registry keys and values. I started to think if it’s possible to delete registry key or value using .reg file.

To create key and value you can use following .reg file:

Windows Registry Editor Version 5.00

[HKEY_CURRENT_USER\Software\test]
“test_value”=dword:00000010


To delete only value “test_value” you can run following .reg file (minus sign after the equal sign):

Windows Registry Editor Version 5.00

[HKEY_CURRENT_USER\Software\test]
“test_value”=


To delete whole key you can run following .reg file (minus sign in front of key name):

Windows Registry Editor Version 5.00

[HKEY_CURRENT_USER\Software\test]


That’s all for now,


Problem with issuing certificate to domain controllers

June 6th, 2014 No comments

I have experienced same problem in two customers within four days. I had server with operating system Windows Server 2012 R2. I installed role Active Directory Certificate Services with default settings. Also default certificate templates were installed. One of the default certificate templates is called Domain Controller and it should be enrolled automatically to all domain controllers using autoenrollment method.

Certification Template

Certificates didn’t autoenroll to domain controllers so I tried to enroll certificate manually. I received following error:

Error: The RPC server is unavailable. 0x800706ba (WIN32: 1722 RPC_S_SERVER_UNAVAILABLE)

CA Error

After couple of minutes of debugging I found out that it should have something to do with security of accessing DCOM object. When I have looked on DCOM security settings I found some domain group called CERTSVC_DCOM_ACCESS. I tried to google for this and I found out that this group should contain all domain members that want to enroll certificate using DCOM. And it was missing “Domain Controllers” group:

certsvc_dcom_access

I just inserted group “Domain Controllers” into domain group CERTSVC_DCOM_ACCESS. Rebooted domain controllers, they had to get new group membership, and everything started to work as expected.

More info here and here.

That’s all for today,

Thumbs.db locked DFSR

May 21st, 2014 3 comments

Problem

I had one problem with DFSR. I had two servers. Server01 in located in Location01 and Server02 located in Location02. There is DFSR Replication Group configured between those two servers. Replication worked in one direction – from Server01 to Server02, but it didn’t work from Server02 to Server01.

Findings

When I looked into backlog of Server02 using command:

dfsrdiag backlog /rgname:Rep_Group /rfname:Rep_Folder /SendingMember:SERVER02 /Receivingmember:SERVER01

I found out that there is lots of files stuck in queue – backlog. All of them were called Thumbs.db. These files are used by Windows Explorer to store thumbnails of files in directories.

Solution

I fixed issue by clearing conflict directory using following commands. I had to find out GUID for my replication folder:

wmic /namespace:\\root\microsoftdfs path dfsrreplicatedfolderconfig get replicatedfolderguid,replicatedfoldername

And then run procedure to clear conflict directory:

wmic /namespace:\\root\microsoftdfs path dfsrreplicatedfolderinfo where “replicatedfolderguid=’GUID’” call cleanupconflictdirectory

After directory clearance replication stared to work.

But I wanted to prohibit to create Thumbs.db files on network shares. I don’t know about any setting that would disable it on client machines so I had to restrict creation on servers. I decided to create File Screen to prohibit Thumbs.db creation on servers.

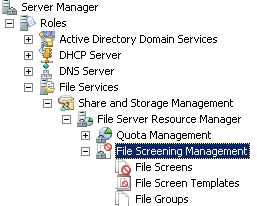
1. On server go to Server Manager — Roles — File Services — Share and Storage Management — File Server Resource Manager — File Screening Management:FS01

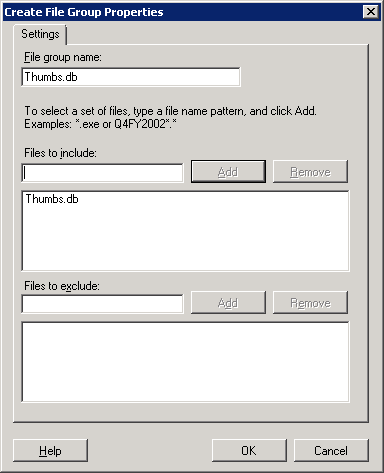
2. Right-click on File Groups and create new File Group:

– Name it

– Include file “Thumbs.db” into list

FS02

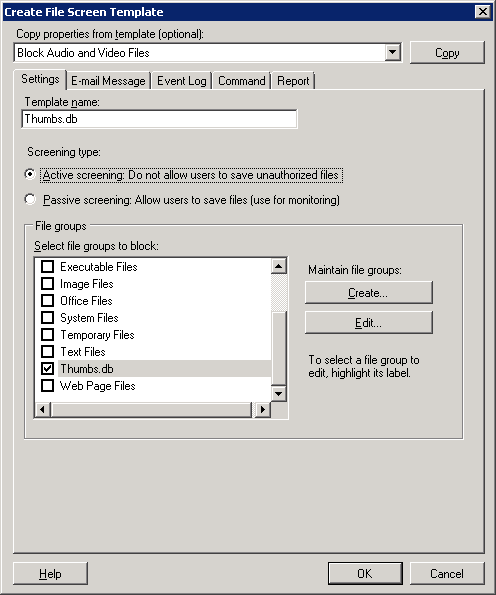
3. Right-click on File Screen Templates and create new screen template:

– Name it

– Make sure you have selected Active screening

– Select new created group “Thumbs.db”

FS03

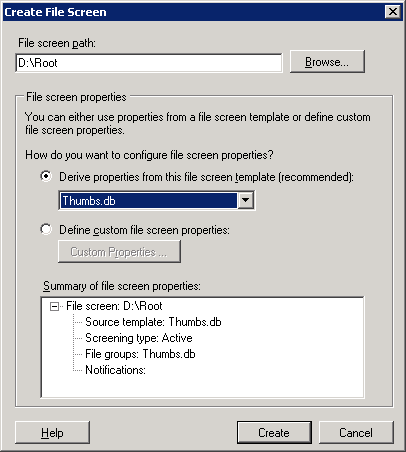
4. Enable file screening on directory. Right-click on File Screens and create file screen.

– Select Path where File Screen should apply

– Select new created File Screen Template

FS04

And screen file is sucessfully set.

One more step I took was delete all Thumbs.db files from server’s disk. I run following powershell command in share directory:

Get-ChildItem -Force -Recurse | where { $_.Name -like “Thumbs.db”  } | Remove-Item -Force

And that’s all for today play with DFSR.

Quickie: Couple helpful command for DFSR

May 21st, 2014 No comments

Today I was solving issue with not replicating DFSR server in Full Mesh topology. Here are couple helpful commands to work with DFSR:

To look if any replication is in progress:

dfsrdiag replicationstate

To look if there is anything in backlog:

dfsrdiag backlog /rgname:Rep_Group /rfname:Rep_Folder /SendingMember:SERVER01 /Receivingmember:SERVER02

To disable debug logging:

wmic /namespace:\\root\microsoftdfs path dfsrmachineconfig set enabledebuglog=false

To set maximum debug files:

wmic /namespace:\\root\microsoftdfs path dfsrmachineconfig set maxdebuglogfiles=2000

To set maximum lines in one log file:

wmic /namespace:\\root\microsoftdfs path dfsrmachineconfig set maxdebuglogmessages=400000

To look for replication folder GUID:

wmic /namespace:\\root\microsoftdfs path dfsrreplicatedfolderconfig get replicatedfolderguid,replicatedfoldername

To clean up conflict directory:

wmic /namespace:\\root\microsoftdfs path dfsrreplicatedfolderinfo where “replicatedfolderguid=’GUID'” call cleanupconflictdirectory

That’s all folks for today,

Categories: Microsoft, Quickie, Windows Tags: , ,

Quickie: Right click using keyboard

April 29th, 2014 No comments

In my class today we needed to do right-click in Windows using keyboard. I just found out that Shift + F10 simulates right-click 🙂

That’s all for today,

How to implement Web Proxy Auto-Discovery Protocol

April 8th, 2014 4 comments

Web Proxy Auto-Discovery Protocol known as WPAD is protocol used by web browsers to locate URL of configuration file using DHCP or DNS.

How does it work?

Computer running web browser must be configured to detect settings automaticaly. It can be turned on in Internet Explorer:

When this browser starts it detects WPAD URL. If browser supports DHCP discovery it will send DHCPINFORM query on network asking for WPAD option. If client doesn’t get DHCP answer it will try DNS query. Let’s assume we have local domain expo.domain.local. Client will try following URLs:

  • http://wpad.expo.domain.local/wpad.dat
  • http://wpad.domain.local/wpad.dat

When this DNS is not successful browser will try URL with NetBios name http://wpad/wpad.dat.

This behaviour can depend on WPAD implementation in browser. Some browser doesn’t use DHCP detection. Some will try also http://wpad.local/wpad.dat URL. I will write only about Internet Explorer behaviour.

Finally when browser gets wpad.dat file from WPAD URL it will parse this file and set proxy settings described in wpad.dat file.

How to make it work?

Let’s assume we have DHCP and DNS services running on Windows Server. We also need IIS installed on server. First of all we need to create new IIS Website:

We will bind this website to port 80 and Host name will be set to wpad.domain.local. We will create new directory C:\inetpub\wpad where website will point. Second, we need to define new MIME type in IIS. Click on IIS server name in IIS console. Then click on MIME Types:

On right side click on action Add.. and define new MIME type (.dat – application/x-ns-proxy-autoconfig):

In directory C:\inetpub\wpad create new file called wpad.dat with following content:


function FindProxyForURL(url, host) {

if(shExpMatch(url,"*intranet/*")) { return "DIRECT"; }

if(shExpMatch(url,"*.domain.local/*")) { return "DIRECT"; }

if(shExpMatch(url,"10.0.*")) { return "DIRECT"; }

if(shExpMatch(url,"192.168.*")) { return "DIRECT"; }

// DEFAULT RULE: All other traffic, use below proxies, in fail-over order.

return "PROXY 10.0.0.100:8080";

}

This file is in format Proxy auto-config (PAC file) and it is self-explanatory. It’s kind of fucntion which says if URL is “*intranet/*, “*.domain.local/*,… browser will go directly to this URL. Those are proxy exceptions. Other not defined traffic will be send to proxy server 10.0.0.100 and its port 8080. This script can be more advanced. Be aware, if you make some mistake some stupid browsers (including Internet Explorer) will skip whole script and not use it 🙂

Now when we have our wpad.dat file ready we can try if we are able to download it using browser. Just try if you can download file http://wpad.domain.local/wpad.dat.

If everything works let’s inform browsers we have published autoconfiguration file.

Publish in DHCP

We need to create new DHCP Option 252 first:

  • Open DHCP Console
  • Right click on DHCP server and select Set Predefined Options and then click Add
  • In Name type wpad, Data type select String and Code type 25

  • Click OK
  • Enter value http://wpad.domain.local/wpad.dat in Value String field
  • Click OK
  • Right-click on Scope Options in DHCP scope where you want add DHCP value 252 and select Configure Options…

  • Scroll all the way down and select DHCP value 252 and click OK

This is all for DHCP setup. Let’s look on DNS setup.

Publish in DNS

You need to create DNS A record wpad.domain.local and point it to IP where WPAD Website runs. Windows servers will not answer on DNS A “wpad” requests. It’s basically for security reason. “wpad” is blocked in DNS by default. In default DNS block list are two records: wpad and isatap. To enable wpad we need to left only isatap in block list. You can do it by command dnscmd /config /globalqueryblocklist isatap.

Remember

  • If browser has DHCP discovery and get some DHCP Option 252, it will not do DNS discovery
  • Some browsers don’t support DHCP discovery. Only Internet Explorer and Konqueror support both the DHCP and DNS discovery functions

That’s all folks for today 🙂

Remote Powershell in domain environment

March 21st, 2014 3 comments

Sometimes you need to run some command on remote computer. If you don’t want to bother user using Remote Assistance or user is not at the computer you can try Remote Powershell. Powershell was new feature when Windows Vista and Windows Server 2008 came. So we can divide operating systems into three categories. Each category requires some things and some requirements.

Windows 7 / Windows Server 2008 R2 and higher

  • Needs to open ports in firewall (is your firewall is not open all the way)
  • Needs to enable and configure WinRM
  • Needs to configure WinRM service to run

Windows Vista / Windows Server 2008

  • Needs everything from first group
  • Needs to install PowerShell 2.0

Windows XP / Windows Server 2003

  • Needs everything from second group
  • Needs to install .NET Framework

Probably your environment will be mixed of all three types of operating systems. So let’s look how to configure it. I will use GPOs everywhere it can be used.

Enable Remote PowerShell for Windows Vista and Windows Server 2008

Create GPO and set following:

Computer Configuration > Policies > Administrative Templates > Windows Components > Windows Remote Management (WinRM) > WinRM Service > Allow automatic configuration of listeners (Allow Remote Server management through WinRM):

Firewall exceptions

Firewall exceptions for Windows 7 / Windows Server 2008 and higher

If you have Microsoft firewall closed and you need to make exception using GPO in Computer Configuration > Policies > Administrative Templates > Network > Network Connections > Windows Firewall > Domain Profile > Windows Firewall: Define inbound port exceptions:

Firewall exceptions for Windows XP / Windows Server 2003

You have to define New Firewall rule under Computer Configuration > Policies > Windows Settings > Security Settings > Windows Firewall with Advanced Security > Windows Firewall with Advanced Security > Inbound Rules and create new Inbound rule with predefined type “Windows Remote Management”:

Configure Service

To enable Remote Powershell I need to configure service. WinRM service has to start automatically. Create new setting in GPO in Computer Configuration > Policies > Windows Settings > Security Settings > System Services. Setup service Windows Remote Management (WS-Management) following way:

Let’s change startup for this service using GPO settings under Computer Configuration > Preferences > Control Panel Settings > Services. Create new Service setting with following settings:

Windows XP / Windows 2003 specialities

To make Powershell work remotely on older operating systems you need to make sure your operating systems have installed two hotfixes: KB968930 and KB951847. These hotfixes are distibuted via Windows Updates so if you use WSUS, there updates are already on your older operating systems.

To enable PowerShell for remote connection you need to enable it using startup script. So you need to create new GPO which will run only on older OS. You can use following WMI filter to make this GPO apply only on older OS:

You can use following script as a startup script to enable Powershell Remote for Windows XP.

To test it you can run following command:

Enter-PSSession -ComputerName COMPUTER_NAME

Active Directory Users and Computes Implementation

To make it look better you can implement connection to computer using Active Directory Users and Computers.

On location \\domain.local\NETLOGON create new Powershell.vbs file:

' ' Script to run Remote Powershell on domain computer '

Set wshArguments = WScript.Arguments Set objComputer = GetObject(wshArguments(0))

' ' Check if Remote Assistance is installed '

Set fso = CreateObject("Scripting.FileSystemObject") 
If (fso.FileExists("C:\Windows\system32\WindowsPowerShell\v1.0\powershell.exe")) Then  
' Is istalled  
   Set objShell = WScript.CreateObject("WScript.Shell")  
   Return = objShell.Run("C:\Windows\system32\WindowsPowerShell\v1.0\powershell.exe -noexit \\domain.local\NETLOGON\Remote_Session.ps1" & objComputer.dNsHostName, 1, false) 
Else  
   ' Is not installed, error.  
   Wscript.Echo "Microsoft Remote PowerShell is not enabled on this machine." 
End If

On location \\domain.local\NETLOGON create new Remote_Session.ps1 file:

[CmdletBinding()]
Param(
  [Parameter(Mandatory=$True,Position=1)]
   [string]$computerName
)

Enter-PSSession -ComputerName $computername

 When files are ready, you need to create new record in Active Directory using adsiedit.msc. Connecto to configuration partition of your domain:

Go to Configuration > CN=Configuration,DC… > CN=DisplaySpecifiers > CN=409 > CN=computer-Display and edit property called adminContextMenu.

Add another record into existing list of records. I used following record:

3, &PowerShell Remote,\\domain.local\NETLOGON\Powershell.vbs

which means:

3 – order of record in the list of records (if you have only one existing record, your number will be 2)

&PowerShell Remote – name of the item in context menu

\\domain.local\NETLOGON\Powershell.vbs – path to vbs script you created

Here is how it looks in one of the environments:

When all is done, your Active Directory Users and Computers console has to be reopened and you will find new record under computer account:

When you click on this new item in context menu new powershell window opens. This powershell window is remote powershell windows from remote computer.

I hope people start using powershell more often,

Broken ForestPrep

March 19th, 2014 1 comment

Friend of mine tried to promote Windows Server 2012 into Windows Server 2003 SBS environment. He had installed Windows Server 2012 Server. He also installed role Active Directory Domain Services. When he tried to promote new installed Windows Server 2012 into existing SBS domain he received following error:

Error was generated while Windows Server 2012 tried to do preparation of AD forest. So I have tried to do it using command line:

So same error (Adprep could not retrieve data from the server through Windows Managment Instrumentation WMI). Some problem with WMI on existing domain controller. I have tried to rebuild WMI from scratch using this article. No luck. Message saying “Access is denied” was not true, because account used to run setup.exe /forestprep was Enterprise, Domain and Schema Admin. When I read this article I found out that DCOM has to be enabled and accessible when doing domain controller promotion. So I looked into configuration of old domain controller following way:

Run command dcomcnfg.exe

Browse down to Component Services -> Computers -> My Computer. Right click and select Properties. I found that DCOM was disabled:

So I enabled it with following settings:

…and I was able to promote Windows Server 2012 as a new domain controller. No more access or WMI errors.

This was really hard one to find out 🙂

DNS netmask ordering

March 19th, 2014 No comments

One customer has two physical locations. Here is following IP setting for both locations:

Location 1 – IP range 10.0.0.0/23 and wpad server is 10.0.0.22

Location 2 – IP range 10.0.2.0/24 and wpad server is 10.0.2.22

When you create two same A records in DNS you get two IP addresses on DNS query. Order of DNS record is changing, because we have Round Robin enabled on our DNS servers. This is default behaviour.  Here is some testing with nslookup:

Same results were in both locations. What we wanted to achieve was that we need DNS servers to return IP address 10.0.0.22 in location Location 1 on first place and IP address 10.0.2.22 in location Location 2 on first place. To make it work we need to look on feature called netmask ordering on DNS servers. You can read more here.

Let’s transfer IP addresses in each location into binary:

10.0.0.0/23

00001010.00000000.00000000.00000000 — 00001010.00000000.00000001.11111111

10.0.2.0/24

00001010.00000000.00000010.00000000 — 00001010.00000000.00000010.11111111

Networks in both locations are same to 22 bit from begging. First different bit in 23rd. So we need to change netmask ordering on DNS server to use first 23 bits to compare when returning results to client. It means our netmask ordering has to be set to:

00000000.00000000.00000001.11111111 — 0x000001FF

We need to set it on all DNS server and restart DNS service:

Once we do this on server we can see following result in Location 1:

and following result in Location 2:

So now it’s all set and ready to go.

Have a great day,

Quickie: Tail in Powershell

February 28th, 2014 2 comments

There is lots of great tools in Linux which are needed in Windows environment. One of the great tool from linux is “tail”. You can use it following way:

tail -f /var/log/mail.log

You will get end of the file and you see all content added to file on screen. You can view log files without need to reopen it. In Windows I use utility Trace32.exe. I was looking for some more native way to do it in Windows. There is a cmd-let Get-Content in Powershell which you can use following way:

Get-Content C:\Windows\WindowsUpdate.log -Wait -Tail 10

This tails only 10 lines from the end of the file and “waits” for new added lines. Switch “Tail” is accessible only in PowerShell 3 and higher.

Powershell is getting there,