Archive

Author Archive

Easy Layer 2 Site to Site VPN

January 17th, 2025 No comments

When you need to connect two sites with same IP subnet, you need to create Site to Site VPN on Layer 2. It means you need to create non-routing VPN between sites. Let’s assume we have following setup:
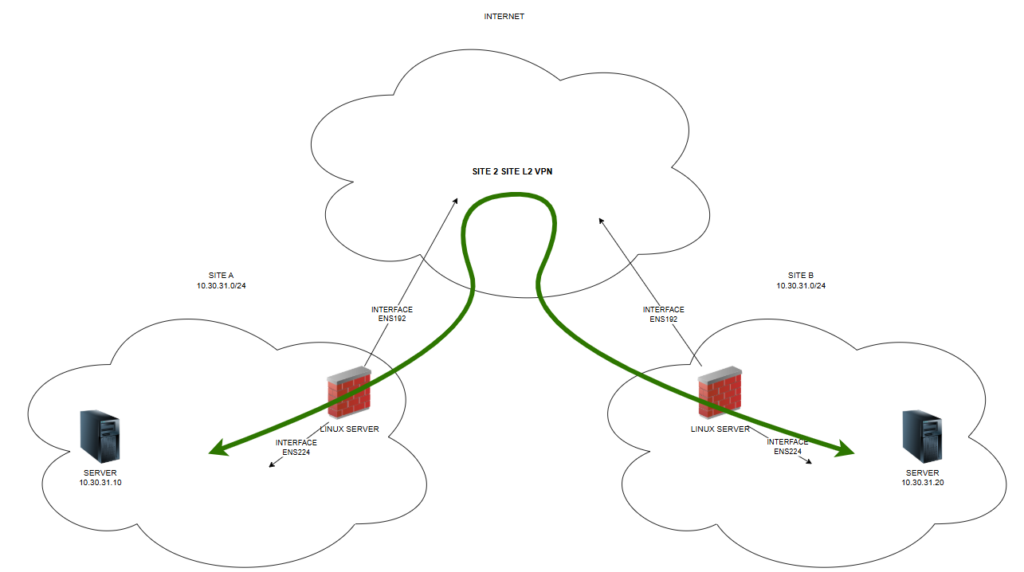
Easy network schema

We need to make sure, that computer 10.30.31.10 can access computer 10.30.31.20 and vice-versa.

We need to install two linux servers. I love Debian distribution. So I have installled two Debian servers on both sites. Both servers have two interfaces:

ens192 – first interface which is used to connect for SSH. It has IP address and it working interface

ens224 – second interface which is in LAN we want to connect. It acts as TAP interface – like cable put into LAN without IP settings. This interface is only up.

You will make SSH connection from one site to another – it means one server has to be accessible from other site. I published TPC/22 (SSH) port from SITE B on Internet. So I could connect from Debian server from SITE A to SSH on Debian server in SITE B. You need to install following packages on Debian:

uml-utilities
bridge-utils
net-tools

Run following commands on both linux servers:

echo 1 > /proc/sys/net/ipv4/conf/all/proxy_arp
echo 1 > /proc/sys/net/ipv4/ip_forward

and make those settings pernament running command:

sysctl -p

On server which will do SSH server you need to change in SSH config file /etc/ssh/sshd_config following settings:

PermitRootLogin yes
PermitTunnel yes

Now are are ready to make SSH connection between linux servers. You have to run following command on “ssh client” server to make connection on “ssh server” server:

ssh -f -o Tunnel=ethernet -o TunnelDevice=0:0 -w 0:0 root@IP_SSH_SERVER true

This command makes SSH connection between linux servers and it creates special interfaces on both linux servers. These interfaces are called tap0. Now we need to bridge interfaces to make VPN work. We have to run following commands on BOTH servers:

Create bridge interface:

brctl addbr br0

Add “cable” interface ens224 and VPN TAP interface into bridge:

brctl addif br0 tap0
brctl addif br0 ens224

And now put all those interfaces up:

ifconfig ens224 up
ifconfig tap0 up
ifconfig br0 up

Now all connection is set and Site to site VPN works as sharm. I never thought it was that easy to create such a connection.

If you have VMWare, settings needed:

VMWare Settings

If you have Hyper-V, settings needed:
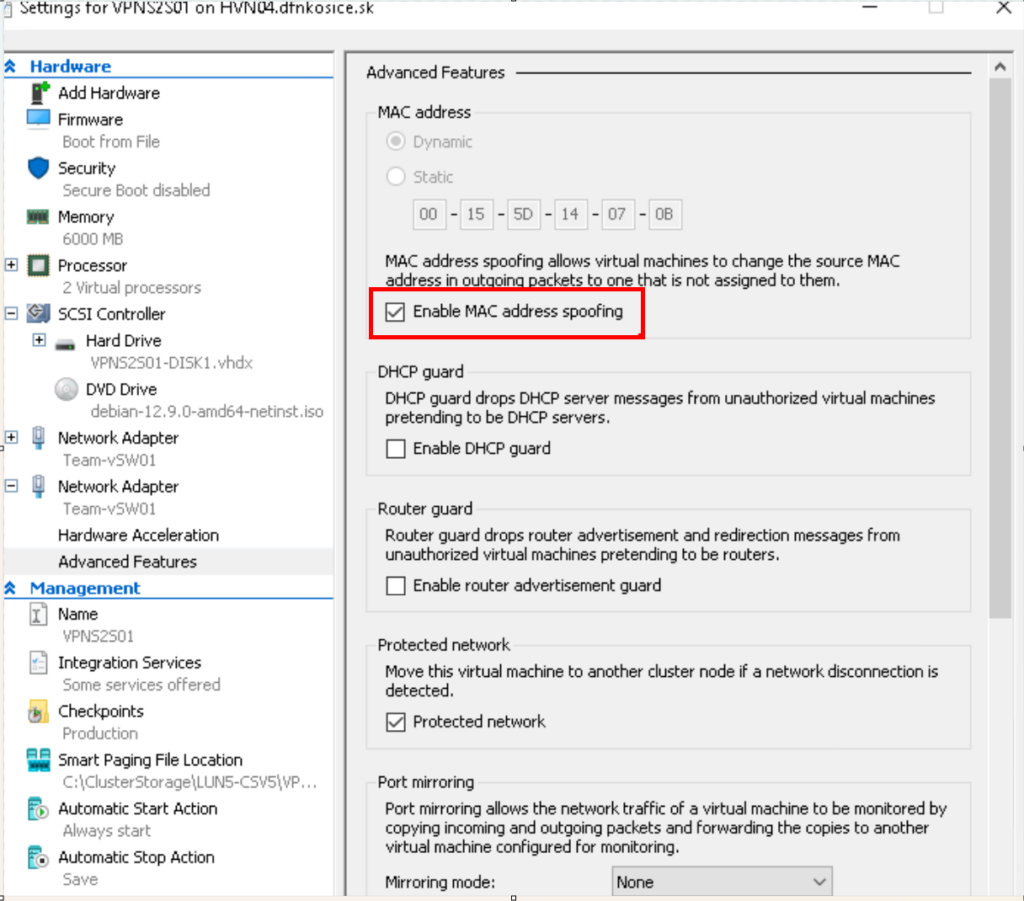
Hyper-V settings

Enjoy.

Thank all folks,

Linux environment on Windows 11

December 27th, 2024 No comments

It is very nice to have Linux environment on Windows computer. It is very easy to install it. Follow these steps:

  • Run cmd.exe
  • Run wsl –install
  • List of available Linux distributions wsl -l -o
  • Install your favorite Linux distro wsl –install -d NameofLinuxDistro
  • Reboot machine
  • Then you can find your favorite Distro:

Enjoy,

Categories: Unassigned Tags:

Make Splunk clean

July 31st, 2024 No comments

This is just a quickie. When you want to reset Splunk Index into default empty state, you can run following commands:

root@splunk01:/opt/splunk/bin# ./splunk stop

root@splunk01:/opt/splunk/bin# ./splunk clean eventdata

root@splunk01:/opt/splunk/bin# ./splunk start

Enjoy,

Manual firmware update for IBM FlashSystems

July 30th, 2024 No comments

Once a while web-based update for firmware on IBM FlashSystem doesn’t work. Or it takes long time to finish. Then there is a time to make update manually by following steps:

  • Download firmware update packages you would like to apply
  • Log to FlashSystem using SSH and run command to clean failed or old files:

cleardumps -prefix /home/admin/upgrade

  • Go back to your computer and upload downloaded firmware payload files into FlashSystem using following commands:

pscp.exe [FILE_TO_UPLOAD] superuser@[IP_FLASHSYSTEM]:/home/admin/upgrade

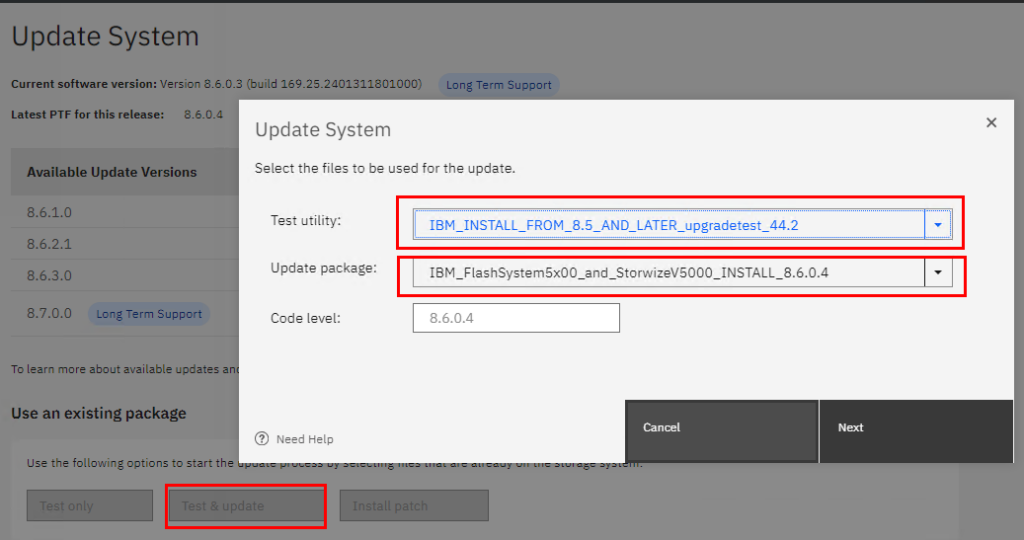
  • When you upload required files (firmware image and upgradetest utility), you can select those files from web update system menu:
  • Now you can proceed update as normal.

This bug with problem to upload huge files into FlashSystems are since 8.6.x.x of firmware.

Enjoy,

How to find most used directories in Linux

July 11th, 2024 No comments

This is very fast quickie. When you want to find which directories take most of the data on Linux use following command:

 du -h -x -d 2 / | grep G

You can change “/” to corresponding directory you are interested in.

Have a nice day,

Categories: Unassigned Tags: , ,

Exchange problem after 1/1/2022

January 2nd, 2022 No comments

Problem

Today I wanted to have day off, but customers with Exchange environments (2013/2016 and 2019) started to have a problem with e-mails delivery. They have started to receive following error in event viewer:

This event started to show couple minutes after 1.1.2022.

Messages stucked at queue and with error “Message deferred by categorized agent”:

Solution

So Antimalware has problem with date “22010100009” and error says it’s “too long”. It looks like Microsoft programmers use to record date 32b numbers and now this value is over variable limits. I think there is will hotfix pretty soon. Until hotfix we need to solve a problem. I just disabled Antimalware engine running following powershell script:

& $env:ExchangeInstallPath\Scripts\Disable-AntimalwareScanning.ps1

and restart MSExchangeTransport service afterwards:

Restart-Service MSExchangeTransport

And that’s all folks 🙂

Windows 7 unable to connect to Wifi with WPA2-Enterprise (802.1

October 28th, 2021 No comments

I have deployed WPA2-Enterprise authentication on network. Computer should use computer certificate to authenticate to Wireless network. I deployed NPS server, configured all requirements. Windows 10 didn’t have problem to connect to Wifi network. Windows 7 computers have problem.

Problem

In eventviewer (Applications and Services Logs\Microsoft\Windows\WLAN-AutoConfig) I found following error:

Network Adapter: Intel(R) Centrino(R) Advanced-N 6205
Interface GUID: {c2c428cb-76cc-4474-a043-33ce2bfe9f0d}
Local MAC Address: 60:67:20:a6:42:63
Network SSID: SECURE_WIFI
BSS Type: Infrastructure
Peer MAC Address: 34:1F:a2:AF:C8:1E
Identity: DOMAN\USER1
User: USER1
Domain: DOMAIN
Reason: Explicit Eap failure received
Error: 0x80074005
EAP Reason: 0x4005
EAP Root cause String:
EAP Error: 0x4005

Solution

Problem is very weird. When you install NPS server, NPS server will use certificate to proof of identity. By default it uses certificate created from Windows CA Template called Kerberos Authentication. This certificate has empty attribute called Subject.

Windows 7 has problem that it doesn’t accept certificate with empty Subject attribute. Other OS’s worked fine. Solution to make it work is to populate this attribute into certificate. You can do it following way:

  • Go to Certificate Template console (use MMC, add snap in –> Certificate Templates) and change template called Kerberos Authentication.
  • Open properties of this template
  • Go to Subject Name tab
  • Change Subject name format to DNS name

Now go to NPS server. Open the Certificates MMC (Computer), go to Personal / Certificates and right click in the details pane – All Tasks / request New Certificate. Request new certificate from template Kerberos Authentication for computer account:

After new certificate is installed under computer certification store, you can find attribute Subject populated with DNS name of NPS server:

When certificate is OK, you can change certificate which should be used to proof identity.

Let’s make new certificate work on NPS server. Open NPS console. Go to Network Policies and open up your policy which handles 802.1x requests. Go to the Constraint tab, Authentication Methods / PEAP and click on Edit.

The certificate expiry date now shown should tie in to the one you just created:

Now also Windows 7 will connect to wireless network with no problem and not error event 🙂

That’s all fokls,

Veeam server rename

October 28th, 2021 No comments

Problem:

Sometimes it happens that you need to rename server where Veeam server is already installed. When you rename server you won’t be able to login into this server. You get following error:

Failed to connect to Veeam Backup & Replication server:

No connection could be made because the target machine actively refused it IP address.

Solution

You have to change server name to new new in registry:

  • open cmd and type regedit
  • go to registry \HKLM\Software\VeeaM\Veeam Backup and Replication and look for REG_SZ value called SqlServerName. Change it to new server’s name.
  • go to registry \HKLM\Software\VeeaM\Veeam Backup Catalog\ and look for REG_SZ value called CatalogSharedFolderPath. Fix it to point to new server’s name share.
  • restart whole server and you are all ready 🙂

Enjoy,

Categories: Veeam Tags: , , ,

Windows port forwarding

November 3rd, 2020 No comments

I didn’t know that it’s possible in Windows TCP/IP stack make port forwarding. I knew it’s possible in Linux using iptables. In windows we have powerful tool called netsh.

Let’s have a example. Some service is listening on port TCP/10000. If I want to make this service listen on other port than TCP/10000 and there is no configuration to change I will use netsh to make it happen. Let’s look at listening ports on TCP/10000 and TCP/20000:

netstat before netsh

We can see there is no port listening on TCP/20000. Let’s make a magic and run command:

netsh interface portproxy add v4tov4 listenport=20000 listenaddress=0.0.0.0 connectport=10000 connectaddress=192.168.100.118

You cannot use loopback or 0.0.0.0 in connectaddress parameter. You can even use remote server IP address in connectaddress parameter.

Let’s look at netstat commands:

netstat after netsh

If your command doesn’t work, please, check if service called IP Helper is Running.

To see all configuration of portproxy settings just run following command:

netsh interface portproxy dump

netsh interface portproxy dump

To delete rule just run following command:

netsh interface portproxy delete v4tov4 listenport=20000 listenaddress=0.0.0.0

And that’s all folks,

Windows update restart problem

November 3rd, 2020 No comments

Once upon the time I had problem with Windows Update. All updates got downloaded and installed. When user click on button Restart Windows got error 0x80070005.

After couple minutes of debugging with Process Monitor I found out that process called explorer.exe had problem with accessing directory C:\Windows\System32\Tasks. That means that if you click on button Restart in Windows Update, Windows doesn’t just restart system. It creates Scheduled Task to reboot. Weird, but it does it this way.

So I have created GPO with security settings for directory C:\Windows\System32\Tasks and allow BUILTIN\Users have Modify rights to this directory.

And that’s the way we make it 🙂